Close

Web-Integrated Chatbot

Built on Amazon Lex


Overview


I created "Danyal's Kitchen", a restaurant that sells milkshakes and ice cream in various flavors, sizes, and locations. Customers will be able to visit the restaurant's website and view the menu. On the website, customers can access a chatbot to place their orders. This chatbot can interact with users through both text and speech. To enhance the user experience, I created response cards. This is especially useful for customers who access the chatbot on their phones. A clip of the chatbot in action can be seen below:

Video Of My Chatbot

Why did I make this project?


I built this project to showcase my skills in cloud computing, using AWS services like Lex, Lambda, S3, CloudWatch, and IAM. Furthermore I showcased my skills in basic web development by creating a static website to serve as a menu. Once I had created the chatbot, I integrated it onto the static website so that customers can view the menu and place an order using the chatbot on a centralized platform.


What problems am I solving?


1. Reducing Customer Wait Time:
The chatbot's biggest factor in improving customer service is reducing wait times. Many small businesses simply do not have enough staff to answer customer calls at any given moment. During holiday seasons or even just weekends, restaurants receive a high volume of takeout orders. The restaurant chatbot solves all these issues by providing customers with a centralized platform to view the menu and place their orders.

2. Reducing Operational Costs:
Small businesses often operate on tight budgets. The chatbot reduces the need for extra staff by handling customer inquiries, reservations, and orders automatically. It works 24/7, ensuring customers get responses even when the restaurant is closed.

3. Eliminating Human Error:
The restaurant chatbot significantly reduces human error, which is a common challenge in fast-paced food service environments. It does this by ensuring order-taking accuracy, eliminating manual data entry errors, standardizing customer interactions (making sure promotions, if any, are mentioned), and avoiding reservation conflicts.


Additional Benefits:


1. Enhancing Efficiency:
Staff can fully focus their time on serving in-store customers and maximizing takeout order efficiency.

2. Multilingual Support:
If the restaurant serves diverse customers, the bot can communicate in multiple languages.


How did I make this Chatbot?


Step 1: Create a Bot

1. Click Create Bot on the Amazon Lex service.
2. Creation Method: Create a Blank Bot.
3. Bot Configuration: Give the bot a name and add a description of what the purpose of the bot is (The title of my bot was "DanyalsKitchen").
4. IAM permissions: select "Create a role with basic Amazon Lex permissions".
5. Children's Online Privacy Protection Act (COPPA): select "no".
6. Click "Next" button on the bottom of the screen.
7. Language: Leave the default language as English. Select a preferred text-to-speech voice for your bot (I chose Matthew).
8. Click "Done" on the bottom of the screen.


Step 2: Create Slot Types

What are slots?
A slot is a placeholder for user-provided information in a chatbot conversation.
For example, in a restaurant chatbot, a user might say: "I want to order a small vanilla ice cream for pickup in Mckinney."
Here "small" (size), "vanilla" (flavor), "ice cream" (item), and "Mckinney" (location) are slot values.

The slots I created were:
1. Food_Item: The options are milkshakes or ice cream.
2. Milkshake_IceCream_Flavors: The options are strawberry, chocolate, or vanilla.
3. Milkshake_IceCream_Sizes: The options are small, medium, or large.
4. Store_Location: The options are Mckinney, Frisco, or Posper (These are cities in the DFW area).

How to Create Slots in Amazon Lex
1. Click "Add slot type".
2. Click "Add blank slot type".
3. Name the slot type according to the table below.
4. Set Slot value resolution to Expanded Values.
5. Enter the corresponding slot values.
6. Click "Save Slot Type" at the bottom of the screen.

Slot Name Slot Values
Food_Item Milkshake,    Ice Cream
Milkshake_IceCream_Flavors       Strawberry,    Chocolate,    Vanilla
Milkshake_IceCream_Sizes Small,    Medium,    Large
Store_Location McKinney,    Frisco,    Prosper

Step 3: Create Intents

What are intents?
In Amazon Lex, an intent represents a specific action or goal that a user wants to accomplish through the chatbot. It defines what the user is trying to do in a conversation.

How Intents Work:
1. User Input: The chatbot listens to what the user says.
2. Intent Matching: Lex tries to match the user's input to a predefined intent.
3. Slot Filling: If required, the bot asks follow-up questions to collect necessary details (slots).
4. Fulfillment: Once all required slots are filled, the bot executes the action (e.g., placing an order).

For example, if a user says: "I want to order a large chocolate milkshake for pickup in Frisco", Lex will match this with an intent titled "Order_Food" and fill in the necassary slots. Once all slots are filled, the bot can confirm the order and process it.

The intents I created were:
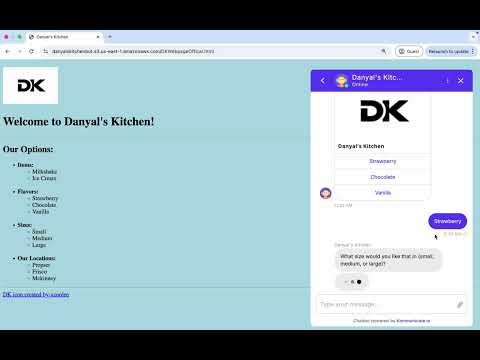
1. Greeting: The purpose of this intent is to greet the customer. If the customer were to open the chatbot and say "Hello", this would prompt Lex to match with the Greeting intent and respond with "Hello! Welcome to Danyal's Kitchen. Would you like to see our menu?"
2. Order_Food: The purpose of this intent is to get orders from customers and place them at the appropriate locations.
3. FallbackIntent: The purpose of this intent is to respond "I'm sorry, I do not understand", to any user inputs that the chatbot cannot recognize or understand.


How to Create Each Intent in Amazon Lex:

Greeting:

1. Click "Intents".
2. Click "Add empty intent".
3. Name the slot type "Greeting"
4. Under "Sample utterances", enter common phrases or words that indicate a greeting. For example, "hello", "hi", "what's up", "Hey Danyal's Kitchen!".
5. Scroll down to "Closing response" and type "Hello! Welcome to Danyal's Kitchen. Would you like to see our menu?"
6. Click "Save intent" at the bottom of the screen.

Order_Food:

1. Click "Intents".
2. Click "Add empty intent".
3. Name the slot type "Order_Food"
4. Scroll down to "Slots"
5. Click "Add Slot". Click a slot type and name it the exact same as the slot type.
6. Add an appropriate prompt.
7. Repeat steps 5 and 6 for the remaining slot types.
8. Under "Sample utterances", enter the following exactly as you see it:
Sample utterances for Order_Food
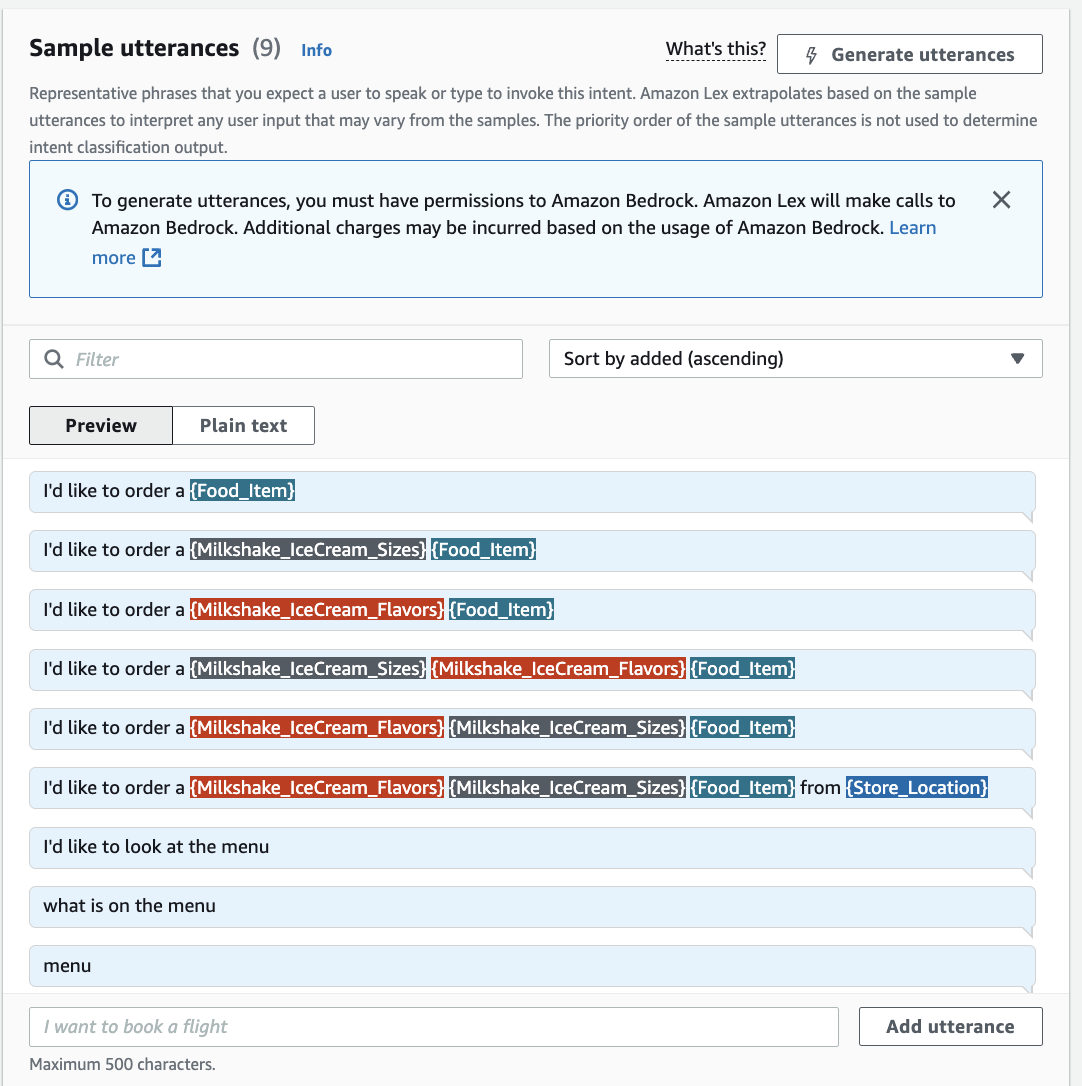
9. Under "Confirmation"
         a. Confirmation Prompt: Alright, so you’d like to order a {Milkshake_IceCream_Sizes} {Milkshake_IceCream_Flavors} {Food_Item} from the {Store_Location} location?
         b. Decline response: Okay, please come back when you are ready to order!
10. Under "Fulfillment"
         a. On successful fulfillment: Great! I have placed your order for a {Milkshake_IceCream_Sizes} {Milkshake_IceCream_Flavors} {Food_Item} at the {Store_Location} location.
         b. In case of failure: Sorry, something went wrong. Please try again.
11. Click the checkmark under "Code Hooks".
12. Click "Save intent" at the bottom of the screen.

FallbackIntent:

1. This intent is already created by Lex by default.
2. Click on the intent and scroll down to the closing response. Update the message to "Sorry, I can't help with that".
3. Click "Save intent" at the bottom of the screen.


Step 4: Create Response Cards

1. Go back to the Order_Food intent and scroll down to "Slots".
2. Click on each of the 4 slots and click "Advanced Options".
3. Scroll down to "Slot Prompts".
4. Click "Add".
5. Click "Add Card Group".
6. Navigate to the GitHub files for this project and download the DK_logo.jpg.
7. Upload the JPEG into an S3 bucket called "DanyalsKitchen".
8. Copy the URL of the image object in S3 and paste it under "Image URL" in Lex.
9. Give the card a title, subtitle, and corresponding buttons depending on the slot.
10. Repeat the process for each slot.

For reference, the flavor response card should look like this:
Flavor Response Card


Step 5: Create a Lambda Function

Why create a Lambda function?
We create a Lambda function to validate our slot data. This means that the chatbot ensures seamless order processing by validating customer inputs (flavor, size, and pickup location) and structuring the order correctly. It handles dialog flow, determining when to ask for missing details or confirm the order. The function can detect if the selections do not match with what the options and notify customers. Most importantly, it sends the finalized order to the appropriate store. This streamlines operations, reduces errors, and enhances customer satisfaction by making the ordering process smooth and efficient (Side note: an additional next step I can make to enhance the project is to trigger order confirmations via SMS or email, and even integrate with payment systems if needed).

How to create the Lambda function:
1. Open Lambda and click "Create function".
2. Select "Author from scratch".
3. Function Name: "DanyalsKitchenOrder".
4. Language: Python.
5. Scroll down and click "Create function".
6. Download the Lambda_Function file from the Lambda folder on github and either:
        a. Upload the code directly into the "DanyalsKitchen" S3 bucket. Go back to Lambda and click "upload from S3 location"
        b. Copy and paste the code into Lambda.
7. Click "Deploy".
8. Go back to the Order_Food intent on Lex and scroll to "Confirmation".
9. Click "advanced options" and scroll to the bottom.
10. Under "Dialog code hook" and click the checkbox to invoke the lambda function.
11. Scroll to "Fulfillment" and click advanced options.
12. Click the checkbox to use the lambda function for fulfillment.
13. Save the intent and click "Build".
14. Click "Test" and click the gear icon. Under Lambda function, select the name of the function we created. Now the chatbot can invoke the Lambda function to validate the slots data.


Key Concepts from the Code

1. Session State: The session state represents the current state of the conversation between the user and the bot.
2. Dialog Action: Indicates the next action Lex should take. Important action types include:

  • delegate – Lambda tells Lex what the next action is.
  • ElicitSlot – Lambda tells Lex which slot should be processed for more user data.
3. Invocation Source: Indicates from which direction Lex called the Lambda function.
  • Dialog CodeHook – Lambda was called after the input was provided from the user.
  • Fulfillment CodeHook – Lambda was called after all the required slot data has been entered, and the intent is now ready for fulfillment.


Step 6: Create a Web Page & Integrate the Chatbot

Step 1: Create a Kommunicate Account
1. Go to Kommunicate and sign up or log in.
2. Navigate to "Bot Integrations" → "Amazon Lex".
3. Click "Integrate Bot" and enter the following details:
    a. Lex Bot Alias ARN
    b. Region
    c. AWS Access Key and Secret Key (Generate these from IAM with permissions for Lex)
4. Save the integration.

Step 2: Get the Kommunicate Chat Widget Code
1. In the Kommunicate Dashboard, go to "Settings" → "Install".
2. Copy the JavaScript snippet provided for the chat widget.

Step 3: Add the Widget to Your Static Website
1. Download the website file from the "My Website" folder and open it in an IDE of your choice.
2. Paste the Kommunicate script just before the closing </body> tag.
3. Save the file and deploy your website.

Step 4: Test Your Integration
1. Open your website and look for the Kommunicate chat widget. It should appear as the following:
Chatbot Widget
2. Type a message and verify that the Lex chatbot responds correctly.
3. If needed, adjust the chatbot’s behavior in Lex or Kommunicate settings.

Step 5: Upload the Website to the S3 Bucket
1. Open your S3 bucket and upload the website file. The website is now hosted by S3.

Step 6: Customize Chat Widget Appearance (Optional)
1. In Kommunicate settings, you can:
    a. Change the bot avatar, welcome messages, and colors.
    b. Enable rich media responses (buttons, images).
    c. Set up human handoff for complex queries.